Showing posts with label How to ..???. Show all posts

Saturday, January 18, 2014

How to disable automatic page or section break in MS word 2013?

By default MS word has auto page/section break in which the last line of the page gets jumped to next page/column before completion of the sentence. In order to disable this feature follow these simple steps.

1. Right click on a paragraph > select Paragraph option. (OR) Click Paragraph settings button from home menu or Page layout menu.


2. Clear the check box for Widow/orphan control under line and page breaks tab and click OK.


Wednesday, June 12, 2013

How do I update google chrome manually (if the chrome installer is not working)?

1] Download the latest offline standalone installer of Google Chrome.
2] Open the installer with 7zip or winrar and extract the archive.
3] It contains 3 exe files and one chrome version folder inside the chrome-bin folder.


4] Copy those exe files including the version folder > paste into "C:\Program Files (x86)\Google\Chrome\Application".

5] Also replace the earlier version of chrome.exe file with the newer version.


Saturday, March 30, 2013

How to play videos in widescreen or 16:9 format in Windows Media Player?

1] Play your video file.
2] Click on the Notification area in the taskbar.
3] Double click on your video decoder, for example ffdshow video decoder.


4] Select Resize & Aspect option > Select Resize to screen resolution and also select No aspect ratio correction under Aspect ratio column.


5] Finally click Apply button to save the changes and OK button to exit.
6] Now Windows Media Player should play your video in widescreen format.

Note: If you can't find any audio/video decoders then you should install codec pack.

Saturday, March 23, 2013

How to play srt, idx, sub files in Windows Media Player for mp4, mkv, avi video formats?

Have your video and subtitle file in a separate folder.
Rename your video and subtitle file with the same name.

Installing Codec Pack:
1. Download K-Lite Codec Pack.
2. Choose Advanced Install > Select DirectShow audio decoding filters for AC3, DTS, LPCM as AC3Filter.


3. Now just scroll down and select appropriate DirectShow Source filters as follows.
  • AVI Splitter - Gabest
  • Matroska Splitter - Gabest
  • MP4/3GP/MOV Splitter - Haali
  • MPEG Splitter - Gabest(TS/PS), Haali(TS)

4. Scroll down and select DirectShow Subtitle filter as DirectVobSub and also put tick mark near other filters for Haali Video Renderer.


5. Scroll down to the bottom and verify that all the Tools and Miscellaneous are enabled and leave the remaining selections as default which is untouched. Once finalized, Click Next button.


6. In the next pane (i.e) Additional Tasks and Options, scroll down to the bottom and select Gabest MPEG splitter as source filter for M2TS files and Click Next.


7. DXVA hardware acceleration and creating File associations are not necessary at this time and you can skip these steps by unchecking the tick marks and click Next.
8. In the next window select your speaker configuration > Click next > Click Install.
9. Once the installation is complete, Restart your PC for the changes to take effect.

Tweaking Windows Media Player :
1. Now Click Start > All Programs > K-Lite Codec Pack > Tools > Win7DSFilterTweaker. In this tool Click Tweaks button.


 2. In this window, disable the Microsoft DTV-DVD Audio and Video decoders by putting tick marks in their boxes > Click Apply & Close button to exit.


3. If it requires a reboot to do this tweak, just go ahead restart your PC and repeat the above step until you see tick marks near them. Close this window once you have done.
4. Now click Preferred decoders button in this tool.


5. Now select the filters for the following 32-bit and 64-bit decoders and finally click Apply & close button to exit.
  • H.264 - ffdshow(DXVA)
  • Xvid - ffdshow
  • Divx - ffdshow
  • MP4V - ffdshow
  • VC1 - ffdshow(DXVA)

6. Once above tweaks are completed, close the Win7DSFilterTweaker tool.
7. Now click Start > All Programs > K-Lite codec Pack > Tools > Codec Tweak Tool > Manage Source Filters.


8. Select the following DirectShow Source filters for the following file types and finally click Apply & Close button to exit.
  • AVI - Gabest
  • MKV - Gabest
  • MP4 - Haali
  • M2TS - Gabest
                   

Playing SRT file in Windows Media Player :
1. Go to Start > All Programs > K-Lite Codec pack > Tools > GraphStudio.
2. In GraphStudio open File menu > Render Media file > locate your *.mp4 file which is in a separate folder along with the srt file.
3. If your mp4 file is directly connected to the ffdshow video decoder & then  to the DirectVobSub filter then Windows Media player will definitely play the srt file.


4. Also right click on mp4 file in GraphStudio > properties. Check that its source filter is Haali Media Splitter.

Haali media splitter for mp4

5. If you get the above monogram then you can play with Windows Media Player.

Windows Media Player plays IDX & SUB file for MP4
Windows Media Player Plays SRT file for MP4

6. Similarly render your mkv file in GraphStudio and check that your mkv file is directly connected to the ffdshow video decoder and DirectVobSub filter.

Gabest filter for MKV file
Windows Media Player plays SRT file for MKV
 
7. But avi file is quite different from the above since it connects separately to the MPC-Avi splitter (Gabest filter) and then to the ffdshow video decoder and DirectVobSub filter.

AVI file monogram with MPC- avi splitter (Gabest)
Windows Media Player plays SRT file for AVI


Conclusion:
1. If you see different filters in GraphStudio apart from the above mentioned,  then you have to disable your default (or) other 3rd party filters using Codec Tweak Tool > Manage DirectShow filters.

Picture shows already disabled 3rd party filters
2. Also make sure that you have enabled the Haali media source filter and Gabest filter. Some times 3rd party filters may disable these.


Enabled Haali and Gabest Source Filters

Friday, August 31, 2012

How to recover data from bad sector Hard Disks

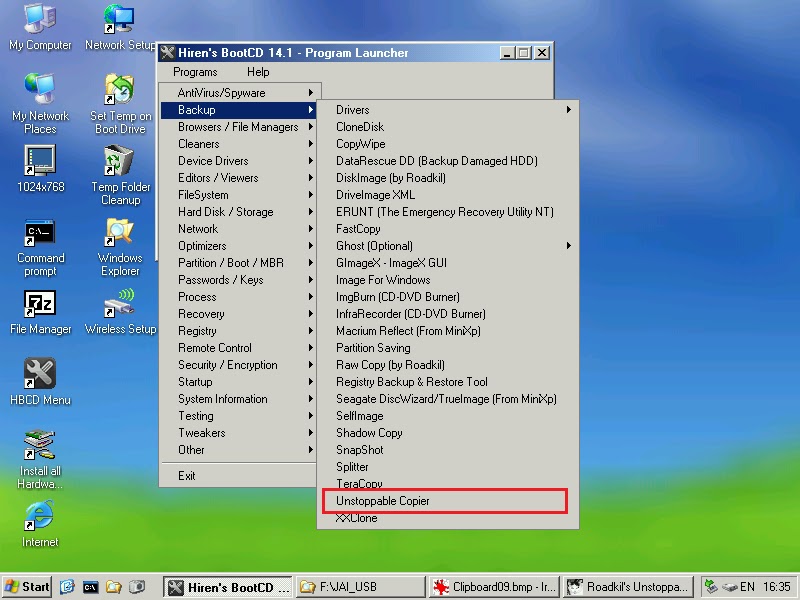
Recovering files from a bad sector hard disk is not an easy job especially the files allocated in bad sectors are not readable and also recovering the corrupted files are time consuming. In this tutor, I use a freeware called Unstoppable copier which is simple and compact program that truly recovers every byte of information that is available for recovery. Directly recovering files from within Windows is not suggested using the above freeware since some file contents might not be readable. Instead using this freeware in a virtual OS or DOS mode gives full advantage over the hard disk.

1. Download Hiren's BootCD and extract the archive and Burn the image file to a CD.

2. Boot your PC with Hiren's BootCD by setting boot priority in BIOS menu.

3. Select and Enter the option "Mini Windows XP" from the menu.


4. Click Start > HBCD Menu.


5. Click Programs > Backup > Unstoppable Copier.


6. Navigate to Settings tab and move the slider to the extreme left corner for best data recovery.


(OR) Move the slider to the extreme right for the fastest data recovery and put a tick mark in Auto skip Damaged files for recovering only undamaged files.


7. After adjusting the desired settings navigate to Copy tab and select the Source (corrupted hard disk drives) and Target (external storage device/Physical drive2) and finally click Copy button.

8. Based on the settings and file contents the transfer speed may differ.


9. You can check the number of corrupt files and skipped files after the completion of process.


10. Once you have finished recovering all your partitions/drives, close this window and restart your PC and then eject the CD out.

Monday, August 06, 2012

How to split and compress a video file for mailing purpose?

Sending a video file over an e-mail is restricted to only about 25MB in Gmail, Yahoo mail and about 50MB in Hotmail. By splitting a video file into two or more files, we can it send over an e-mail. But splitting the original video files with video editors would lead to loss in video/audio quality. Here I suggest a freeware for splitting, loss-less compressing and merging the video files for sending over an e-mail as an attachment within 11MB.

Solution:
1] Download and install 7-Zip file archiver.
2] Now Right click over a video file which you need to split > select 7-Zip > select Add to archive.


3] Now set Compression level as Store and choose 10MB from the Split to volumes, bytes box > click Ok button to split and compress the video file into several parts based upon the original size.


4] The resulted file types will be stored as 001, 002, 003 and so on.


5] So if a person receiving these files over an e-mail will need a similar file archiver like 7-Zip, Winzip, Peazip, Winrar etc for merging these files.

For Merging/Joining the splitted video files (7z.001, 7z.002, etc)
6] Just right click the first file 001 > select 7-Zip > select Extract here option.


7] The resultant combined video file will be the original video file (of same size) without loss of quality.

Note1: You can also encrypt the archive by setting a password in the Add to archive box.
Note2: This method is simple and effective for the file types like flv, mpeg-4, avi etc.

Tuesday, June 19, 2012

How to create more than four partitions in a Hard Disk

In general a Basic disk with MBR partition table can support
  • 4 MBR Primary partitions. Here u can install upto 4 operating systems in each partition like Windows XP in partition0, Vista in partition1, Se7en in partition2 and Ei8ht in partition3 where the Earlier versions must be installed first. 
  • 3 MBR Primary partition and 1 Extended partition with 128 Logical volumes in the extended partition. Here it is safe to install more than 4 operating systems including Linux based operating systems like Ubuntu, Fedora, RedHat etc.
If your hard disk is already partitioned into 4 MBR primary partition, it is necessary to delete one partition so that it can be extended upto 128 logical volumes. Backup your data to other volume before deleting a partition.

Solution:
1] Download Ubuntu LiveCD and burn the image file to a CD to make it a bootable one.

2] Boot the PC with this CD by setting priority in your BIOS menu or Boot options @ startup.

3] Choose the option "Try Ubuntu without making changes to your Hard Disk".

4] Go to Administration > Preferences > GParted.

5] It will display all empty free space as Unallocated in grey color. If you have already installed 4 primary partitions, you must delete one partition in order to have unallocated space for creating an extended partition.


6] Right click on Unallocated partition > Create New Partition > Create as Extended Partition > Click Add button.


7] Now Click Apply all operations button to complete the process. This also can be done after completing all the steps.


8] Now Right click on Unallocated under Extended File system > Create New Partition > set Create as Logical Partition  and set the File System as ntfs and allocate your New Size in MB by reducing it > Click Add button.


9] Like this your remaining Unallocated space under Extended File system can be divided upto 128 Logical Volumes including the above.


10] After all Click Apply all operations button to complete the process.


11] Once completed Restart your PC and take the Ubuntu LiveCD out.

12] After rebooting into Windows you can check using Disk Management utility.

Example1:  Here the Hard Disk is partitioned into
  • 1 MBR Primary Partition
  • 1 Extended Partition with 3 Logical Volumes
Example 1: I have installed Windows XP in a Primary Partition & Windows 7 in a Logical Volume under Extended Partition


Example2:  Here the Hard Disk is partitioned into
  • 2 MBR Primary Partition
  • 1 Extended Partition with 5 Logical Volumes
Example 2


Example3:  Here the Hard Disk is partitioned into
  • 3 MBR Primary Partition
  • 1 Extended Partition with 2 Logical Volumes
Example 3

Note1: In some cases by default System Reserved Volume was created during Windows installation and act as a primary partition. In order to avoid this unnecessary primary partition, delete this partition using GParted Ubuntu LiveCD. So that you can have a complete usage of four MBR primary partitions.

Note2: May or may not loss of data occurs during partition. So that backup your data to other external hard disks before partition.

Livefyre